This exquisitely crafted and well-proportioned bra radiates an aura of allure and charm (enchantment school), making it a powerful tool for those who dare to wear it. Designed for universal use, it can be worn by any gender and its effects are not bound by the gender of the target.
Effect: When the wearer of the Bra of Fascination comes within melee range of a creature, that creature must succeed on a DC 20 Charisma saving throw or become charmed by the wearer. The charm effect only functions if the creature can see the bra and the wearer is not obscured from view.
While charmed, the target is captivated by the bra and regards the wearer as a trusted ally or someone to be admired.
The charm ends if:
The charmed creature takes damage.
The wearer and the charmed creature move out of melee range from each other.
Additional Details:
The bra must be worn on top of any other clothes as an outer garment otherwise it is not visible and won’t work, and only functions as an ordinary bra.
Only one creature can be charmed at a time.
This charm effect does not stack with other charm effects, but the wearer may attempt to charm a new target if the previous charm ends.
The Bra of Fascination’s magic does not affect creatures that are immune to being charmed or those that cannot see.
The Bra of Fascination’s magic does not affect creatures that have a sufficiently different physiology from humanoids.
This item is a 4-meter-long red ribbon that can be easily rolled or scrunched. When used in combat, the Red Tape can be thrown as a ranged weapon or used with a touch attack to ensnare a target in its binding grasp.
Range: 10 meters (ranged attack)
Attack Modifier: Dexterity modifier added to attack rolls
Effect: When the Red Tape hits a target, it immediately wraps around them and imposes the Bureaucratic Condition.
Bureaucratic Condition: While ensnared, the target must complete a specific task or condition to free themselves from the Red Tape. The condition must be something the target can reasonably achieve, though it may be inconvenient, challenging, or time-consuming.
The condition can be physical, mental, or skill-based, such as:
Successfully hugging the nearest bunny rabbit.
Completing a Wisdom (History) check to pass a history quiz.
Completing a “Weapons/Spells Safety Induction Module” before using their weapon or spells again.
The DM determines the condition, tailoring it to the target’s capabilities. Suggested Difficulty Class (DC) for resolving the condition is 12-15.
While affected by the Red Tape:
The target’s movement speed is halved, unless the movement directly contributes to resolving the imposed condition.
The target has disadvantage on attack rolls and ability checks, unless the action directly pertains to resolving the condition.
The condition persists until successfully resolved or the Red Tape is removed by external means, such as a successful Strength check (DC 15) to tear it off or a dispel magic spell.
The Red Tape regains its full functionality at the end of a long rest if it has been torn or dispelled.
Currently the abode of a wizard trying to make her constructs by using magic items as a power source.
This tower is built on a lone rocky knoll rising from the boggy marsh.
A one-shot adventure for 4 level 3 characters.
Level 1
(Top right on the map below)
Room 1
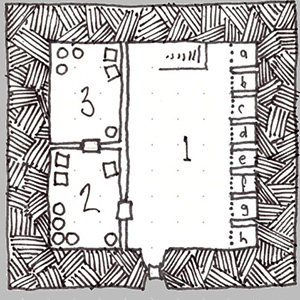
Room 1 is a large room about 25ft. by 45ft. Stairs lead up to the far end of the room. There’s a closed door in the wall to the left, and the right-hand side of the room is made up of eight jail cells, each 5 feet square.
An Imp is busily unlocking cells and calling “Fight! Fight for your lives!”.
If the party can approach the tower stealthily, the imp will use its first round to fly to cell “H” and open it. If the imp had any kind of warning (remembering the imp is the mage’s familiar, so it’s in communication with her), then the imp will already have open cell “H” and will be moving to cell “G”.
Each round, the imp will move to the next cell and release the occupants, skipping the empty cells of course. The imp will open as many cells as possible, but if it’s attacked it will fly up the stairs to escape.
Room 2
Store Room.
General supplies are in here. Extra empty bottles, spare clothes, bedding etc. Some weapons taken from prisoners are kept in here as well.
2 battle axes
2 daggers
1 Longsword
1 set chain mail armour
1 set of leather armour
Room 3
Store Room.
Food and wine are stored here.
5 dozen bottles of average-quality wine. (1gp per bottle, 1lb each)
2 dozen bottles of above-average quality wine (3gp per bottle)
1 dozen bottles of some very nice wine (7gp per bottle)
1 dozen portions of perishable rations (last about 1 week).
1 dozen portions of dry rations. (6gp)
An assortment of dried mushrooms (2gp, 1lb)
2 hams hanging from the ceiling:
1 cured ham, quite nice, worth 10gp.
1 dry-cured ham, rare, worth 30gp.
A small chest has been placed underneath a barrel filled with rocks that weighs 600 lbs. This will require a combined STR of 20 to lift.
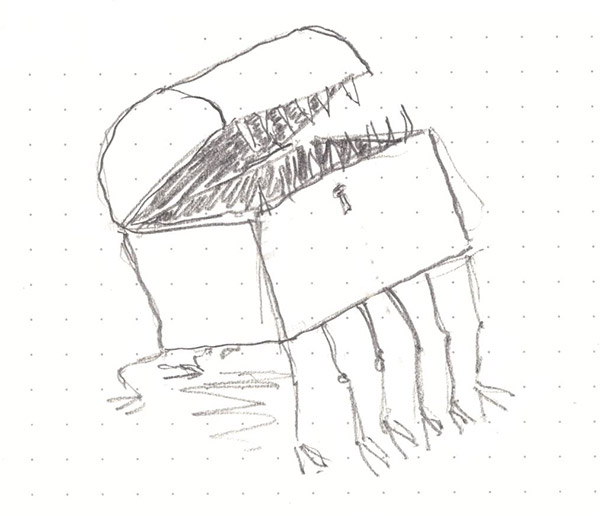
As soon as the barrel is lifted off the small chest, the chest sprouts a dozen small legs with webbed duck feet. The little feet pitter-patter as the chest scurries away to hide behind one of the crates in the room where it peeks out shyly.
The chest is a Faithful Chest and will be grateful for being released. If treated nicely by a member of the party, and perhaps fed, it will likely bond with the character and follow them, letting them store treasure in it.
Level 2
Living Quarters.
Room 4
Hallway
There’s not much to say about this one. It’s a hallway. 1 door and 2 stairs, one going up, one going down.
Room 5
Study
At the end of the room is a desk. Stacks of paper and some quill pens lie about and 2 bottles of ink (8gp each). The notes, written in the mage’s own script, outline experiments to use magical items to power constructs.
Room 6
Closet
Spare wizard robes and casual clothes. Each outfit is worth about 5sp. There are 10 identical wizard robes, slightly worn, and several other casual outfits can be found in this closet. Some hats and shoes are tossed carelessly in here.
Room 7
Bedroom.
A reasonably sparse bedroom (the wizard doesn’t spend much time in here when not sleeping). The bed is large and soft.
There is a large desk against one wall with a small chest on it. The chest has Arcane Lock cast on it (DC 25 to open). The chest contains:
37cp
13sp
37gp
3pp
4 gems worth 40gp, 35gp, 30gp, and 25gp.
Room 8
Closet.
7 identical sets of “wizard” robes in good condition, worth 1gp each. Some nice casual outfits are here as well.
2 robes appear to be more formal wizards wear and made from silk and worth 10gp each.
Level 3
Room 9
The whole 3rd floor is taken up by the wizards’ lab. This is where she will be found. Three large work tables contain various magical and alchemical apparatus. There is a ladder that leads up to a trapdoor in the ceiling. A magic circle is engraved on the floor near the middle of the room. A medium humanoid thing that appears to be made of mud, sticks, and moss, stands in the magic circle.
The mage will attempt to engage the party in conversation and even offer them employment to fetch some magic items for her. If negotiations go badly, she will instruct the Bog Golem to attack. She’ll backup the golem, and probably have her familiar attack as well, but if the fight isn’t going well, she’ll use a scroll of dimension door to exit the scene, taking her spell book with her. The imp will either follow through the dimension door or exit via the window.
On the tables around the room are diagrams and plans for various animata and golems. There is also a map of the local area.
Level 4
Room 10
The roof is accessible via a trap door in the roof. It opens into a covered section of the roof. There is a plush velvet chair up here where you can sit and relax while taking in the view. A small three-legged drinks table stands next to the chair with a bottle of port and glass next to it. The chair has been enchanted to stay in nice shape despite the weather and has an aura of transmutation magic if detected. The table is a magical construct that will run away from anyone who comes near it, while not dropping the bottle or glass.
Languages Understands the languages of its creator but can’t speak
Challenge 3
Proficiency Bonus +3
Aversion of Fire.If the golem takes fire damage, it has disadvantage on attack rolls and ability checks until the end of its next turn.
Spike Growth (Recharge 5-6): As a bonus action, the Animata can cast Spike Growth. The effect spreads rapidly out from where the Animata is standing and can’t be cast at range. The Animata is not affected by the spell and can move freely and without taking damage while in the affected area. If the Animata moves, the Spike Growth area remains where it was. The Animata does not need to concentrate to maintain the spell, but it only lasts 1 minute.
Actions
Multiattack. This creature can attack twice per round
Slam.Melee Weapon Attack: +6 to hit, reach 5 ft., one creature. Hit: 12 (2d8+3) bludgeoning damage.
This underground lair is home to a nasty brute: Kevin the Undead Minotaur! Kevin has been down here a looooong time and died centuries ago and is now a Mummy Minotaur.
A one-shot for 4 level 3 characters.
In the game I was running, I located this dungeon beneath the Onyx Hill Ruins by Dyson Logos, but of course, you can put it anywhere you want.
Note: There are no light sources anywhere in this dungeon except for those the characters bring with them.
Level 1
Level 1 has a large square obsidian column in the middle which slightly tapers towards the top. It is 10 feet wide at the base. The column has an ancient script carved into its surface. If translated, the script tells a tale of ancient battles.
The four Living Statues’ alcoves, two to the north and two to the south come to life as the party enters and start attacking.
There is a pressure plate trap (DC 12 to spot) on the ground as the players enter the room which drops a net on anyone who triggers the trap. Effect as per Net from the PHB equipment.
The spiral stairs at the west end of this level go down to level 2.
Level 2
The obsidian column is larger here, 15 feet across at its’ base. There are more statues here, running down each side of the hall. The statues look exactly like the ones on level 1, but there are 18 of them! Fortunately these just regular normal statues. The real danger here are the 5 Shadow creatures in residence here.
At the East end of this hall is an alter, carved out of the same obsidian as the column. There’s nothing particularly interesting about the alter except for the dark stains on it. Right in front of the alter is an open pit. It’s a 40 foot drop down to the next level but the pit is the only way to get down to the next level.
Level 3
Level 3 is covered by a permanent darkness spell in all areas except for the room in the middle where the base of the pillar is. Lots of bones are scattered on the floors of the various caverns down here.
Kevin The Mummified Minotaur lives (exists?) down here. Between its Blindsight and Labyrinthine Recall, it has no problem with the darkness down here. With nothing better to do, it just wanders the caverns.
Whenever the players enter a new cavern, there is a 1 in 6 chance the Minotaur will be in this room. It isn’t very hospitable and will attack straight away, starting with its charge attack unless the players can somehow get within 10 feet of it before it attacks.
If the Minotaur isn’t encountered by the time the players reach the central room, the Minotaur will be there waiting for them and will start attacking using its’ Dreadful Bellow and then charging them.
The obsidian pillar is quite wide here (20 feet across at the base). There are more inscriptions on the pillar here, telling the tale of XXX. There is a secret door in the pillar which should be relatively hard to find (DC 18). Inside is a stone bench with a small golden bull statue on it. It’s a figurine of wondrous power, and can become a bull for 8 hours but can’t be used again for 5 days. The bull can be ridden, pull a wagon, and can attack if provoked. See below for stats.
There is also a scattering of coins of different denominations on the bench worth 223gp
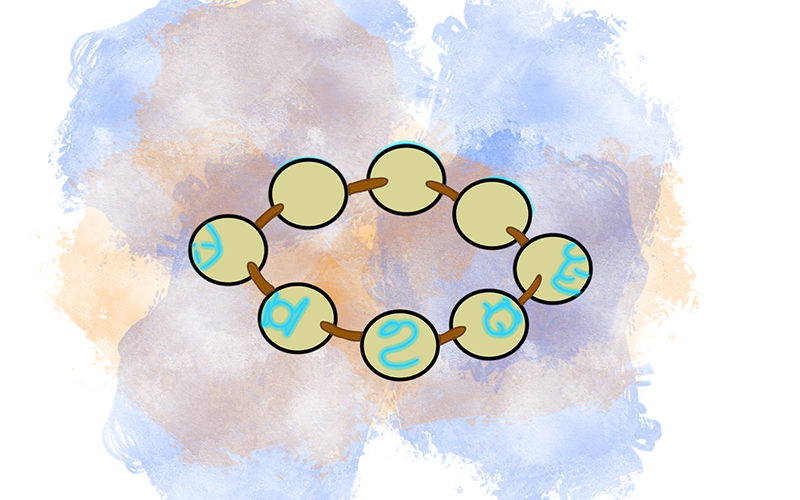
There is a legend that eight great masters from eight monasteries came together to overthrow a mighty evil. Each fought in a distinctly different style, but their total strength was far greater than the sum of their individual schools, and so they won the day. For many years after, they remained close allies, until their inevitable passing. A tomb was built to honour the eight lords, and as each died, they were brought to the tomb and laid to rest. Each lord was interred with a magical sphere which held part of their power. The location of that tomb is now lost.
This old watchtower is leftover from the Golden Empire. It was once a watchtower on the border, but in the many years since the collapse of the empire, it was abandoned to the wilderness. In spite of its age, this structure is in remarkably good shape and still habitable and is currently the abode of a wizard engaged in private study.
Level 1
Room 1
A large, relatively empty area. Small (5′ by 5′) cells line the east wall.
Room 2
Store Room.
General supplies in here. Extra empty bottles, spares clothes, bedding etc. Some weapons taken from past prisoners kept in here as well.
2 battle axes
2 daggers
1 Longsword
1 set chain mail armour
1 set leather armour
Kree’s Spear will be in this room.
Room 3
Another Store Room.
Food and wine stored here.
5 dozen bottle of average quality wine
2 dozen bottles of above average quality wine
1 dozen bottles of some very nice wine
1 dozen portions of perishable rations
1 dozen portions of iron rations
An assortment of dried mushrooms
2 cured hams hanging from the ceiling.
Level 2
Living Quarters.
Room 4
Hallway
Nothing much to say about this one. It’s a hallway. 1 door and 2 stairs, one going up, one going down.
Room 5
Study
At the end of the room is a desk. Stacks of paper and some quill pens lie about and 2 bottles of ink. Notes written in draconic outline experiments in the use of magical items to power constructs.
Room 6
Closet
Spare wizard robes and casual clothes. Nothing special.
Room 7
Bedroom.
A reasonably sparse bedroom with a large bed.
Room 8
Closet.
Spare robes.
This is where the wizard stores his formal wizards wear. These robes are cut from better cloth, literally. Nice silk and satin robes.
Level 3
Room 9
The whole 3rd floor is taken up by the wizards’ lab. Three large work tables contain various magical and alchemical apparatus. There is a ladder that leads up to a trapdoor in the ceiling. A magic circle is engraved in the floor near the middle of the room.
Level 4
Room 10
The roof is accessible via a trap door. It leads into a covered section of the roof (probably used in ages past as shelter for any guards on duty). There is a great view from up here, but nothing else of any interest.
This one is inspired by The Luggage from Diskworld and is part Mimic and part Bag of Holding.
It’s a small chest, 12 inches long by 7 inches wide and 5 inches high (not including the lid). When open, the inside is an extra dimensional space which can hold a lot more than the exterior dimensions would suggest.